TL;DR:
- Most small eCommerce brands can gain over 1,000 engaged subscribers within 60 to 90 days by stacking targeted capture points early. Building a high-quality list relies more on offer relevance and hygiene than simply increasing volume, with a healthy growth rate of 1 to 3 percent monthly. Swyftinteractive offers Klaviyo automation builds that turn subscriber data into revenue, supporting sustainable eCommerce growth.
Go from zero to your first 1,000+ engaged subscribers by running a three-stage sequence: capture setup, welcome automation, and multi-channel promotion. Most small eCommerce brands can hit that milestone in 60–90 days without paid ads, provided they stack the right capture points from day one.
Here’s where to start today:
- Enable checkout opt-in. Your checkout page is the highest-intent moment on your site. Post-purchase opt-in rates can run 45–60% for properly prompted guest buyers. Turn it on before anything else.
- Publish one lead magnet landing page. A single focused offer (a discount, a buying guide, or a quiz) gives you a URL to promote everywhere.
- Install an exit-intent popup. Paired with checkout opt-in and a mobile-specific form, these three capture points together can produce a modest site-wide email capture rate within 30 days.
Timeline callout:
- Day 7: Checkout opt-in live, exit-intent popup active, welcome email sent automatically.
- Day 30: Lead magnet landing page published, 3–5% site capture rate achieved, welcome series running.
- Month 3: Referral program live, paid lead ads tested, list segmented by engagement tier.
Pro Tip: Don’t wait until your site is “perfect” to start capturing. A basic popup and a checkout opt-in running on a mediocre site will outperform a polished site with no capture at all.
Table of Contents
- What does a step by step email list growth playbook actually look like?
- Which ESP should you choose, and what do you set up on day one?
- What lead magnets actually convert, and how do you write the copy?
- How do you design sign-up forms that actually get filled out?
- What should your welcome series look like?
- How do you drive opt-ins beyond your own website?
- How do you measure list growth and know if it’s actually healthy?
- What are the U.S. compliance rules, and how do you keep your list clean?
- When should you scale, and when does it make sense to hire an agency?
- Key Takeaways
- The part most guides skip: list quality beats list size every time
- Swyftinteractive builds the Klaviyo systems that turn your list into revenue
- Useful sources
- FAQ
What does a step by step email list growth playbook actually look like?
Think of list building in three phases: tooling and baseline (Day 0), high-impact captures (Days 1–7), and scale (Weeks 2 through Month 3+). Here’s the full sequence.
Day 0: tooling and baseline
Before you capture a single subscriber, spend two hours on setup. Skipping this creates deliverability problems later that are painful to fix.
- Choose your email service provider (ESP) and create your account.
- Authenticate your sending domain with SPF and DKIM records.
- Create your first list or audience segment.
- Install your ESP’s tracking snippet on your site.
- Set up a basic welcome email so new subscribers get an immediate response.
Days 1–7: high-impact captures
These are the fastest wins, requiring no content creation and no ad budget.
- Checkout opt-in: Add a pre-checked (or clearly visible unchecked) opt-in box at checkout. This single action is often the highest-volume capture point for any store.
- Exit-intent popup: Install a popup triggered when a visitor moves toward closing the tab. Keep it to two fields maximum: email and first name.
- Mobile-specific form: Mobile users need a different trigger (scroll depth or time-on-page, not cursor movement). Set a separate mobile popup with a shorter headline.
Measure your capture rate at the end of Day 7. If it’s below 1%, your offer or headline needs work before you add more traffic.
Pro Tip: Watch your ESP dashboard’s “new subscribers by source” report daily during the first week. If checkout opt-in isn’t your top source by Day 3, check that the integration is firing correctly — it’s the most commonly misconfigured capture point.
Weeks 2–4: lead magnets, landing pages, and referral setup
Once your on-site captures are working, add depth.
- Build one lead magnet (see Section 4 for templates) and publish a dedicated landing page for it.
- Add an embedded form to your two highest-traffic blog posts or product pages.
- Set up a basic referral incentive: “Give $10, get $10” or a free gift with a referred purchase.
- Connect your lead magnet landing page URL to your social bio links.
Months 2–3: scale with paid and partnerships
Validate organic conversion rates first. Once your landing page converts above 20% and your welcome series has a measurable open rate, paid traffic becomes worth testing.
- Launch a Meta or Google lead ad pointing to your validated landing page.
- Identify two or three complementary brands for a joint giveaway or newsletter swap.
- Add a quiz or interactive tool to your site if your product category supports it.
- Review your list growth rate monthly. A healthy benchmark is 1–3% monthly growth; under 1% signals a traffic or offer problem, not a volume problem.
Which ESP should you choose, and what do you set up on day one?
Three ESPs dominate the U.S. small business and eCommerce market: Klaviyo, Mailchimp, and ConvertKit. They serve different needs, and picking the wrong one creates migration headaches later.
Klaviyo, Mailchimp, and ConvertKit compared
| Feature | Klaviyo | Mailchimp | ConvertKit |
|---|---|---|---|
| Best for | eCommerce, high-volume senders | Beginners, general small business | Creators, service businesses |
| Free tier | Up to 250 contacts / 500 emails/month | Up to 500 contacts / 1,000 emails/month | Up to 10,000 subscribers (send limit applies) |
| Ease of setup | Moderate (Shopify/WooCommerce plug-and-play) | Easy (drag-and-drop, minimal tech) | Easy (form-first, minimal design) |
| Automation depth | Advanced (predictive analytics, flows) | Basic to intermediate | Intermediate (visual automations) |
| Deliverability tools | Built-in domain warm-up guidance, engagement segments | Standard | Standard |
| Pricing at 1k subscribers | ~$20/month | — | Free (limited sends) |
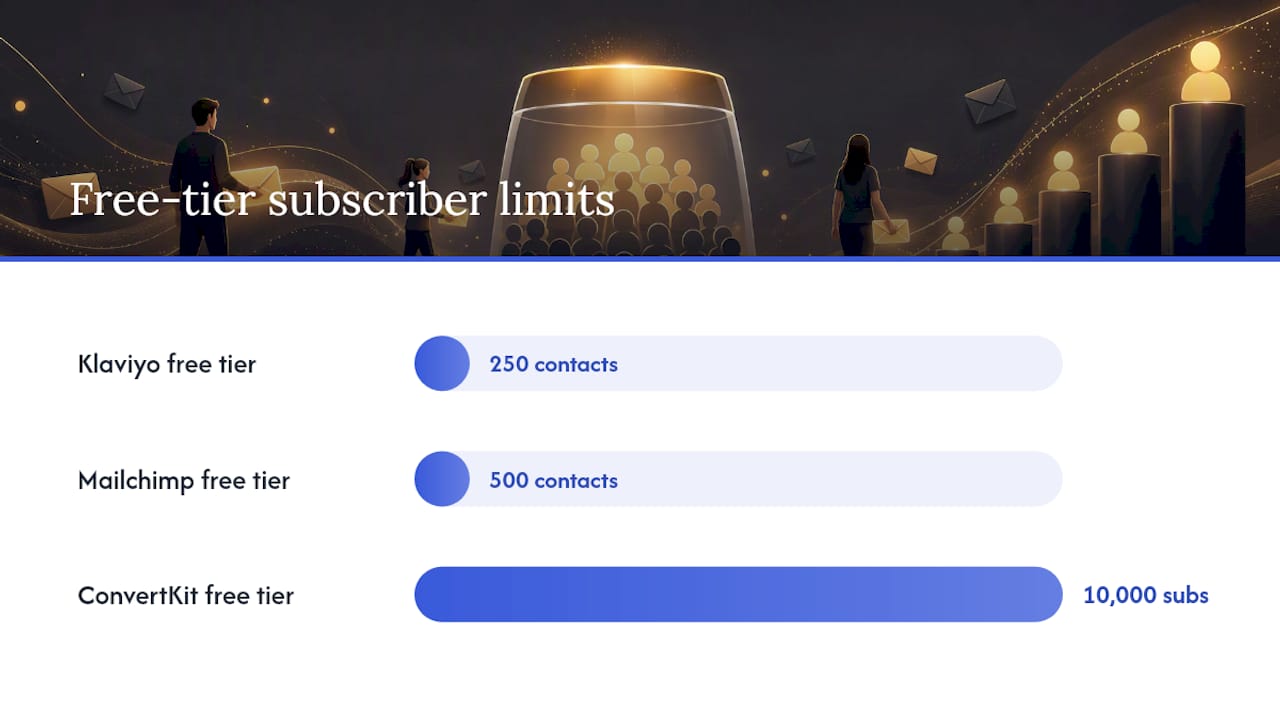
Klaviyo is the strongest choice for any eCommerce brand planning to use behavioral triggers, predictive segmentation, or Shopify/WooCommerce integrations. Its free tier is tight (250 contacts), but the platform’s data model is built around purchase behavior from day one. See Klaviyo’s specific advantages for eCommerce brands if you’re deciding between it and a simpler tool.
Mailchimp works well for founders who want to get something live in under an hour and don’t yet have an eCommerce store driving behavioral data. The drag-and-drop builder is genuinely fast, and the 500-contact free tier gives you room to validate before paying.
ConvertKit fits creators, coaches, and service businesses better than product brands. Its tag-based subscriber model is flexible, but it lacks the native eCommerce integrations that Klaviyo and Mailchimp offer out of the box.
Day-one setup checklist
- Authenticate your sending domain: add SPF and DKIM records in your DNS settings. Most ESPs provide a step-by-step guide. Without this, your emails land in spam.
- Create your first segment or list (active subscribers, source-tagged).
- Import any existing contacts with explicit opt-in history only.
- Build a welcome email skeleton: subject line, brand intro, one CTA.
- Set your “from” name and reply-to address to a real inbox, not a no-reply address.
Deliverability note: New sending domains need a warm-up period. Start by sending to your most engaged contacts first (even if that’s just 50 people), then ramp volume over 2–4 weeks. Jumping straight to bulk sends on a fresh domain is the fastest way to hit spam filters. For a deeper look at email marketing best practices that protect deliverability from day one, Swyftinteractive’s guide covers the technical and content-side rules together.
What lead magnets actually convert, and how do you write the copy?
A lead magnet is only as good as the offer’s relevance to the subscriber’s intent. The mistake most small brands make is defaulting to a blanket discount when a more targeted offer would capture higher-quality subscribers.
High-converting lead magnet types
- Discount or first-order offer (“15% off your first order”): highest raw opt-in volume, but attracts deal-seekers. Use it when you need volume fast and your margins support it.
- Buying guide or product quiz (“Find your perfect fit in 60 seconds”): lower volume, but subscribers who complete a quiz have demonstrated real purchase intent. Conversion to first purchase tends to be stronger.
- Early access or waitlist (“Be first to know when drops”): works well for product launches and limited editions. Builds anticipation without discounting.
- Product-care or usage guide (“The complete care guide for your ”): excellent for post-purchase capture and for categories where buyers have questions (skincare, supplements, outdoor gear).
- Contest or giveaway (“Enter to win a $200 bundle”): high volume, but list quality varies. Best used with a qualifying question or purchase requirement to filter intent.
Brands that shift away from blanket discount capture see fewer raw opt-ins but higher revenue per email and less discount dependency over time. If your margins are tight, a buying guide or quiz is worth testing against a discount offer.
Microcopy templates you can paste today
Discount popup:
Headline: “Your first order just got cheaper.”
Benefit line: “Get 15% off when you join our list — no minimum, no catch.”
CTA button: “Claim my 15% off”
Quiz opt-in:
Headline: “Not sure which is right for you?”
Benefit line: “Answer 3 quick questions and we’ll match you to the perfect fit.”
CTA button: “Take the quiz”
Early access:
Headline: “Get in before everyone else.”
Benefit line: “Join the waitlist for early access and an exclusive launch discount.”
CTA button: “Add me to the list”
What to test first
Run a two-week A/B test on your popup with one variable changed at a time: headline first, then offer value, then CTA button copy. Judge a winner by opt-in rate (not traffic volume). A 20% lift in opt-in rate on a popup that fires 500 times per week compounds fast.
How do you design sign-up forms that actually get filled out?
Form design is where most brands lose subscribers they already had. The visitor was interested enough to stay on the page. A clunky form or a poorly timed popup sends them away.
Field count and placement
The optimal field count is 2–4 fields; adding more than six causes measurable conversion drops. When in doubt, ask for email only. You can collect first name, phone number, and preferences later through progressive profiling (a follow-up email or account setup flow).
Placement priority, from highest to lowest impact:
- Checkout opt-in (highest intent, least friction)
- Exit-intent popup (catches abandoning visitors)
- Product page embedded form (contextual, mid-funnel)
- Mobile-specific form (scroll-triggered, not cursor-triggered)
- Blog content embed (mid-article or after a key section)
- Footer form (low-intent, but catches deliberate seekers)
Timing rules
Exit-intent triggers work on desktop (cursor leaves the viewport). On mobile, use a scroll-depth trigger (70–80% of page) or a time-on-page trigger (45–60 seconds). Never fire a popup during checkout. That single rule prevents a meaningful percentage of cart abandonment caused by distraction.
Form UX do’s and don’ts
- Do include a one-line privacy note under the submit button (“We respect your privacy. Unsubscribe anytime.”).
- Do use benefit-driven button copy (“Get my 15% off”) instead of generic copy (“Submit” or “Sign up”).
- Don’t use a multi-step forced gate for basic list capture. If someone has to click through three screens to get a discount code, most won’t.
- Don’t auto-subscribe visitors who create an account without a visible opt-in checkbox. This creates compliance risk and inflates your list with unengaged contacts.
Pro Tip: Test your popup on a real mobile device, not just a browser emulator. Emulators miss common rendering issues — cut-off CTAs, overlapping text, and submit buttons that sit behind the keyboard.
What should your welcome series look like?
Your welcome series is the highest-read sequence you’ll ever send. Open rates on welcome emails routinely outperform standard campaigns by a wide margin, which means this is where your brand story, your best offer, and your clearest CTA belong.
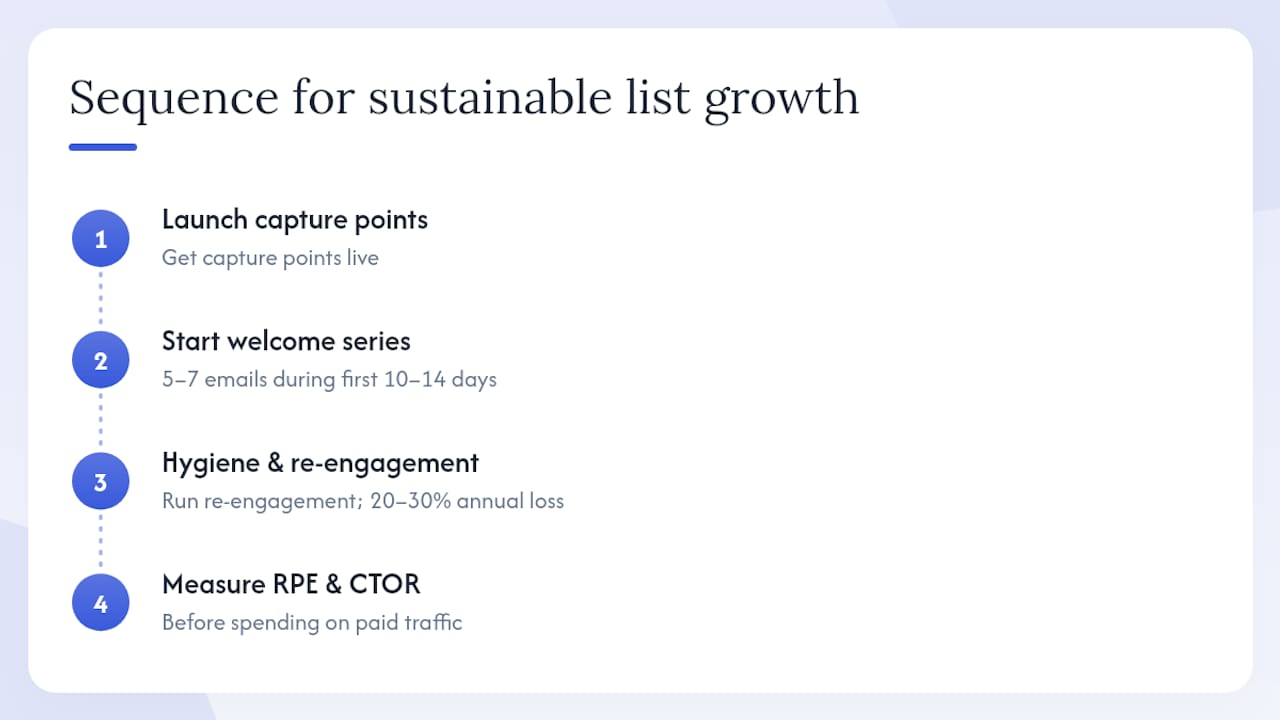
Longer, thoughtful sequences of 5–7 emails over 10–14 days tend to lift first-purchase conversion compared to short sequences, particularly when the first email doesn’t lead with a hard pitch.
Sample 5-email welcome flow
| Timing | Primary goal | Subject line angle | |
|---|---|---|---|
| 1 | Immediately | Deliver the offer, set expectations | “Here’s your 15% off (+ what to expect from us)” |
| 2 | Day 2 | Brand story, build trust | “Why we started [brand] — and what makes us different” |
| 3 | Day 4 | Bestseller spotlight | “Our most-loved product right now (and why)” |
| 4 | Day 7 | Social proof + urgency | “What 500+ customers say about ” |
| 5 | Day 10 | Soft re-engagement / last call | “Your discount expires soon — here’s what people are buying” |
Core automations to configure early
Beyond the welcome series, four automations drive the majority of email revenue for most eCommerce brands. Set these up before you invest in campaigns. For a full walkthrough of how these automations connect, Swyftinteractive’s email automation examples for eCommerce shows how each flow maps to revenue outcomes.
- Abandoned cart: Trigger 1 hour after cart abandonment. Three-email sequence (1 hour, 24 hours, 72 hours). Subject line angle: reminder, then social proof, then urgency.
- Browse abandonment: Trigger 4–6 hours after a product page view with no add-to-cart. One or two emails. Keep it light — the subscriber hasn’t committed yet.
- Post-purchase: Trigger immediately after purchase. Confirm the order, set delivery expectations, and introduce a cross-sell or care guide on Day 3.
- Winback: Trigger after 90 days of inactivity. Two to three emails with a re-engagement offer. If no response, move the contact to a suppression segment.
Automation sanity checks
Before you go live with any flow, send a test to yourself and check: does the personalization token (first name, product name) populate correctly? Does the unsubscribe link work? Does the email render on mobile? These three checks catch 90% of launch errors.
How do you drive opt-ins beyond your own website?
Your site captures subscribers from existing traffic. To grow the list faster, you need to pull in people who haven’t found you yet.
Channel checklist
- Social bio links: Point your Instagram, TikTok, and Pinterest bio links to your lead magnet landing page, not your homepage. A homepage has too many exits; a landing page has one goal.
- Stories and short-form video: Show the lead magnet in action. A 15-second video of someone taking your quiz or unboxing a free guide drives more clicks than a static post.
- Meta and Google lead ads: Run a lead ad pointing to your validated landing page once your organic conversion rate is above 20%. Validate on-site capture before spending on paid traffic — paid amplifies what’s already working, it doesn’t fix what isn’t.
- Partnerships and joint giveaways: Find two or three brands with overlapping audiences and no direct product competition. A joint giveaway (“Win a $500 bundle from [Brand A] + [Brand B]”) splits the cost and doubles the reach. Each brand emails their list; both collect opt-ins.
- Packaging and receipts: Add a QR code to your packaging insert that links to a post-purchase landing page with a referral offer or loyalty program signup. Customers who just bought something are your most motivated subscribers.
- Events and offline capture: Collect emails at pop-ups, markets, and trade shows using a tablet form or a QR code. Feed these directly into your ESP with a source tag so you can track their downstream engagement.
Sample paid lead-ad brief
- Objective: Lead generation
- Audience: Lookalike of your top 1,000 customers (1–2% lookalike)
- Creative: Single image or short video showing the lead magnet
- Headline: “Get [offer] free — takes 30 seconds”
- Landing page: Dedicated opt-in page, no navigation, one CTA
- Budget: Start at $10–$20/day; scale only after 50+ leads at a cost-per-lead you can justify against average order value
Referral program basics
A simple referral structure: existing subscribers get a unique link. When a friend subscribes and makes a purchase, both parties get a reward (store credit, a free product, or a discount). Track referral signups with a source tag in your ESP. Watch for fraud signals: multiple signups from the same IP address or email domain clusters. Most ESP integrations with referral tools (like ReferralCandy or Friendbuy) handle this automatically.
How do you measure list growth and know if it’s actually healthy?
Raw subscriber count is a vanity metric. A list of 10,000 unengaged contacts costs more to send to and generates less revenue than a list of 2,000 buyers who open every email.
Core metrics to track
| Metric | What it measures | Healthy benchmark |
|---|---|---|
| List growth rate | Net new subscribers as % of total list | 1–3% monthly |
| Unsubscribe rate | % leaving per send | Under 1% per campaign |
| Open rate | % opening each email | 20% for eCommerce |
| Click-to-open rate (CTOR) | Clicks as % of opens | 10–20% |
| Revenue per email (RPE) | Revenue generated per email sent | Varies by brand; track trend |
| Bounce rate | Hard + soft bounces per send | Under 2% |
Segment taxonomy
Divide your list into four engagement tiers and treat each differently:
- Active: Opened or clicked in the last 30 days. Send everything.
- Warm: Engaged in the last 31–90 days. Send campaigns and flows normally; watch for decay.
- Cooling: No engagement in 91–180 days. Reduce send frequency; add to a re-engagement sequence.
- Cold: No engagement in 180+ days. Suppress from regular sends; run a winback flow, then sunset.
Beyond engagement, segment by buyer status (purchased vs. never purchased) and predicted next purchase date if your ESP supports it. Klaviyo’s predictive analytics model surfaces this automatically. For a detailed email list segmentation process tailored to eCommerce, Swyftinteractive’s guide walks through the full taxonomy.
Testing cadence
A/B test one variable per send. Subject lines first (they affect open rate, which affects everything downstream), then offer or CTA, then send time. You need a minimum of 200 recipients per variant to draw a reliable conclusion. Run the test for at least 4 hours before declaring a winner, and don’t test on your smallest segment — low sample sizes produce false positives.
When monthly growth stalls below 1%, the problem is almost always traffic volume or offer relevance, not email mechanics. Check your capture rate by source: if checkout opt-in is converting below 20%, the offer needs work. If exit-intent is below 2%, the headline or timing is off.
What are the U.S. compliance rules, and how do you keep your list clean?
CAN-SPAM basics
The CAN-SPAM Act sets the floor for commercial email in the United States. The core requirements are straightforward:
- Include a clear, working unsubscribe link in every commercial email.
- Honor opt-out requests within 10 business days.
- Use accurate “From,” “To,” and “Reply-To” header information.
- Include your physical mailing address (a P.O. box is acceptable).
- Don’t use deceptive subject lines.
CAN-SPAM applies to commercial messages, not transactional ones (order confirmations, shipping updates). That distinction matters when you’re deciding which emails need an unsubscribe footer.
Note: This is general information, not legal advice. Confirm your specific obligations with a qualified attorney or the FTC’s published guidance.
List hygiene action plan
Annual churn from unsubscribes and address decay typically runs 20–30%, which means a list of 5,000 contacts loses 1,000–1,500 subscribers per year just through natural decay. Acquisition has to outpace that to show net growth.
- Monthly: Remove hard bounces immediately. Review complaint rates in your ESP dashboard. If complaints exceed 0.1% of sends, pause and investigate the source segment.
- Quarterly: Run a re-engagement flow for your Cooling segment. Two or three emails with a clear subject line (“We miss you — here’s something for coming back”) and a single CTA.
- Every 6 months: Sunset Cold contacts who didn’t respond to the winback flow. Move them to a suppression list, not a delete. You may need the suppression record for compliance purposes.
- Ongoing: Tag subscribers by acquisition source. If one source (a giveaway, a paid ad) consistently produces high unsubscribe rates, the offer attracted the wrong audience.
Deliverability pro tip: Keep your sending domain’s complaint rate below 0.1% (Google’s threshold for Gmail deliverability) and your hard bounce rate below 2%. Both metrics are visible in your ESP’s deliverability dashboard. Crossing either threshold triggers filtering that affects your entire list, not just the problematic segment.
When should you scale, and when does it make sense to hire an agency?
Scaling checklist
Once your organic list is growing consistently and your welcome series is converting, you’re ready to layer in paid and partnership channels.
- Layer in paid lead-gen once your landing page converts above 20% organically.
- Add a referral program once you have 500+ active subscribers (enough to seed the referral loop).
- Test brand partnerships and joint giveaways once you have a clear audience profile to pitch to partners.
- Add predictive segmentation and advanced flows (VIP, loyalty, upsell) once your list exceeds 2,000 active subscribers.
Signals it’s time to hire an agency
DIY works well up to a point. These are the signals that external help will pay for itself:
- Your welcome series and core flows are live, but revenue per email is flat or declining.
- You’ve hit 1,000+ subscribers but can’t identify which segment is driving purchases.
- You’re spending more than 10 hours per week on email and still not testing systematically.
- You’re about to run a major promotion (Black Friday, product launch) and your automation architecture isn’t ready.
An agency like Swyftinteractive typically scopes work in two models: a one-time project (audit + build) or an ongoing retainer (management + optimization). A project engagement usually covers a Klaviyo lifecycle audit, flow builds (welcome, cart, post-purchase, winback), and a segmentation setup. A retainer adds campaign management, A/B testing cadence, and monthly reporting.
Pro Tip: Before hiring any agency, ask three questions: Who owns the ESP account and data when the engagement ends? What KPIs are in the contract? What does the handoff process look like? Agencies that can’t answer all three clearly are worth avoiding.
Questions to ask before signing
- What deliverables are included in the first 30 days?
- How do you measure success, and what’s the reporting cadence?
- Do we retain full ownership of our ESP account, flows, and subscriber data?
- What does the offboarding process look like if we end the engagement?
For brands ready to see what a structured Klaviyo build looks like, Swyftinteractive’s email automation workflow for eCommerce walks through the architecture from capture to post-purchase.
Key Takeaways
Building a healthy email list requires stacking high-intent capture points, running a 5–7 email welcome series, and monitoring list growth rate monthly to catch problems before they compound.
| Point | Details |
|---|---|
| Stack capture points first | Checkout opt-in, exit-intent popup, and mobile form together can hit a 3–5% site-wide email capture rate within 30 days. |
| Choose the right ESP early | Klaviyo fits eCommerce; Mailchimp suits beginners; ConvertKit works best for creators and service businesses. |
| Lead magnets drive quality | Quizzes and buying guides attract higher-LTV subscribers than blanket discounts, even at lower raw opt-in volume. |
| Measure growth rate monthly | A healthy list grows 1–3% per month; under 1% signals a traffic or offer problem that more email volume won’t fix. |
| Swyftinteractive for scale | For brands ready to move beyond DIY, Swyftinteractive builds Klaviyo lifecycle flows, segmentation, and full automation architectures tied to measurable revenue outcomes. |
The part most guides skip: list quality beats list size every time
The conventional wisdom on email list growth is almost entirely about volume. Grow faster. Add more capture points. Run more giveaways. And yes, those tactics work — but they optimize for the wrong number.
The metric that actually predicts whether your email program makes money is revenue per email (RPE). A list of 500 buyers who open your emails and purchase regularly will outperform a list of 5,000 giveaway entrants who never buy. The math isn’t even close. Yet most small brands spend their first year chasing subscriber counts and then wonder why their email revenue doesn’t move.
The second thing most guides understate is the leaky bucket problem. Your list is losing 20–30% of its contacts every year through unsubscribes, address decay, and disengagement. That means a flat subscriber count is actually a declining one in real terms. You’re not maintaining — you’re losing ground. The brands that grow their lists sustainably are the ones that treat acquisition and hygiene as equally important, running re-engagement flows and suppression routines on the same schedule as their capture campaigns.
The third gap: onboarding. Most brands send one welcome email, maybe two, and then drop subscribers into their regular campaign cadence. That’s a missed opportunity. The welcome window (the first 10–14 days) is when subscribers are most likely to open, click, and buy. A 5–7 email sequence that earns trust before it pitches is worth more than six months of weekly campaigns to a cold list.
If you’re building from scratch, the order of operations matters more than the tactics themselves. Get your capture points live. Get your welcome series running. Measure RPE and CTOR before you spend a dollar on paid traffic. That sequence is what separates the brands that hit 1,000 engaged subscribers in 90 days from the ones that hit 1,000 unengaged contacts and wonder why nothing converts.
Swyftinteractive builds the Klaviyo systems that turn your list into revenue
Most eCommerce brands hit a ceiling with DIY email: the capture points are live, the welcome email is running, but the automation architecture that connects list growth to actual revenue never gets built. That’s the gap Swyftinteractive closes.
Swyftinteractive specializes in Klaviyo lifecycle builds for eCommerce brands — from the initial Klaviyo lifecycle audit and strategy through full flow architecture (welcome, cart, post-purchase, winback), segmentation setup, and ongoing campaign management. The work is tied to measurable outcomes: open rates, CTOR, RPE, and revenue attributed to email. Clients come in with a working store and a growing list; they leave with an automation system that captures, converts, and retains subscribers without manual effort.
If you’re ready to move from a basic setup to a full eCommerce growth strategy built on automation, the next step is a discovery call or a Klaviyo audit. Both give you a clear picture of what’s working, what’s missing, and what to build first.
Useful sources
The sources and tools below back the benchmarks, legal requirements, and tactical recommendations in this article.
| Source | What it covers |
|---|---|
| CAN-SPAM Act: A Compliance Guide for Business (FTC) | Authoritative U.S. legal requirements for commercial email: unsubscribe rules, header accuracy, opt-out timelines |
| List Growth Rate: KPI Definition, Formula & Tips (AgencyAnalytics) | Benchmark definition and healthy monthly growth rate targets for email lists |
| How to Grow Your Email List: 20 Ecommerce Tactics (Omnisend) | Capture-point stacking tactics, annual churn benchmarks, and organic-first acquisition sequencing |
| How to Build an Email List That Actually Drives Revenue (Ecommerce Times) | Post-purchase opt-in rates, discount vs. quality tradeoffs, and RPE-focused capture strategy |
| Email Marketing Strategy for Small Ecommerce Brands (SuccessKnocks) | Welcome sequence length recommendations and first-purchase conversion benchmarks |
| How to Build an Email List for Your Online Store (Land & Convert) | Exit-intent and checkout opt-in as Day 1 quick-win tactics |
| How to Grow Your Shopify Email List Faster (Mastroke) | Field-count rules, benefit-driven copy recommendations, and form conversion guidance |
Practical tools mentioned in this article:
- Klaviyo (klaviyo.com): eCommerce ESP with predictive segmentation and Shopify/WooCommerce integrations
- Mailchimp (mailchimp.com): Beginner-friendly ESP with a generous free tier
- ConvertKit (convertkit.com): Creator-focused ESP with tag-based subscriber management
- ReferralCandy / Friendbuy: Referral program tools that integrate with major eCommerce platforms
FAQ
How fast can you realistically grow an email list?
Most small eCommerce brands can reach their first 1,000 subscribers in 60–90 days by stacking checkout opt-ins, an exit-intent popup, and a lead magnet landing page before adding paid traffic.
What is a good email list growth rate?
A healthy list grows 1–3% per month; brands seeing under 1% monthly growth typically have a traffic or offer problem, not an email mechanics problem.
How do you grow an email list quickly?
The fastest early-stage wins are checkout opt-ins and exit-intent popups. Together with a mobile-specific form, these three capture points can deliver a 3–5% site-wide email capture rate within 30 days.
What is the 3-3-3 rule in marketing?
The 3-3-3 rule is not a standardized industry framework with a single canonical definition; different practitioners use the phrase to describe different sequencing or messaging principles. Focus instead on the proven sequencing in this guide: capture, onboard, then scale.
How do you build an email list from scratch in 2026?
Start with Day 0 setup (ESP account, domain authentication, welcome email), then activate checkout opt-in and an exit-intent popup in the first week. Add a lead magnet landing page in Week 2, promote it across social channels, and layer in paid traffic only after your organic conversion rate is validated above 20%.