
Connection problems can stall even the most promising email marketing strategy. For American ecommerce managers, setting up Klaviyo the right way means your customer data flows seamlessly and your automations actually work. Klaviyo integrates with platforms like Shopify, Magento, and WooCommerce, acting as a secure service provider that follows data privacy frameworks. This guide walks you through key steps to lay a strong foundation, from account setup and integrations to building workflows for sustained revenue growth.
Table of Contents
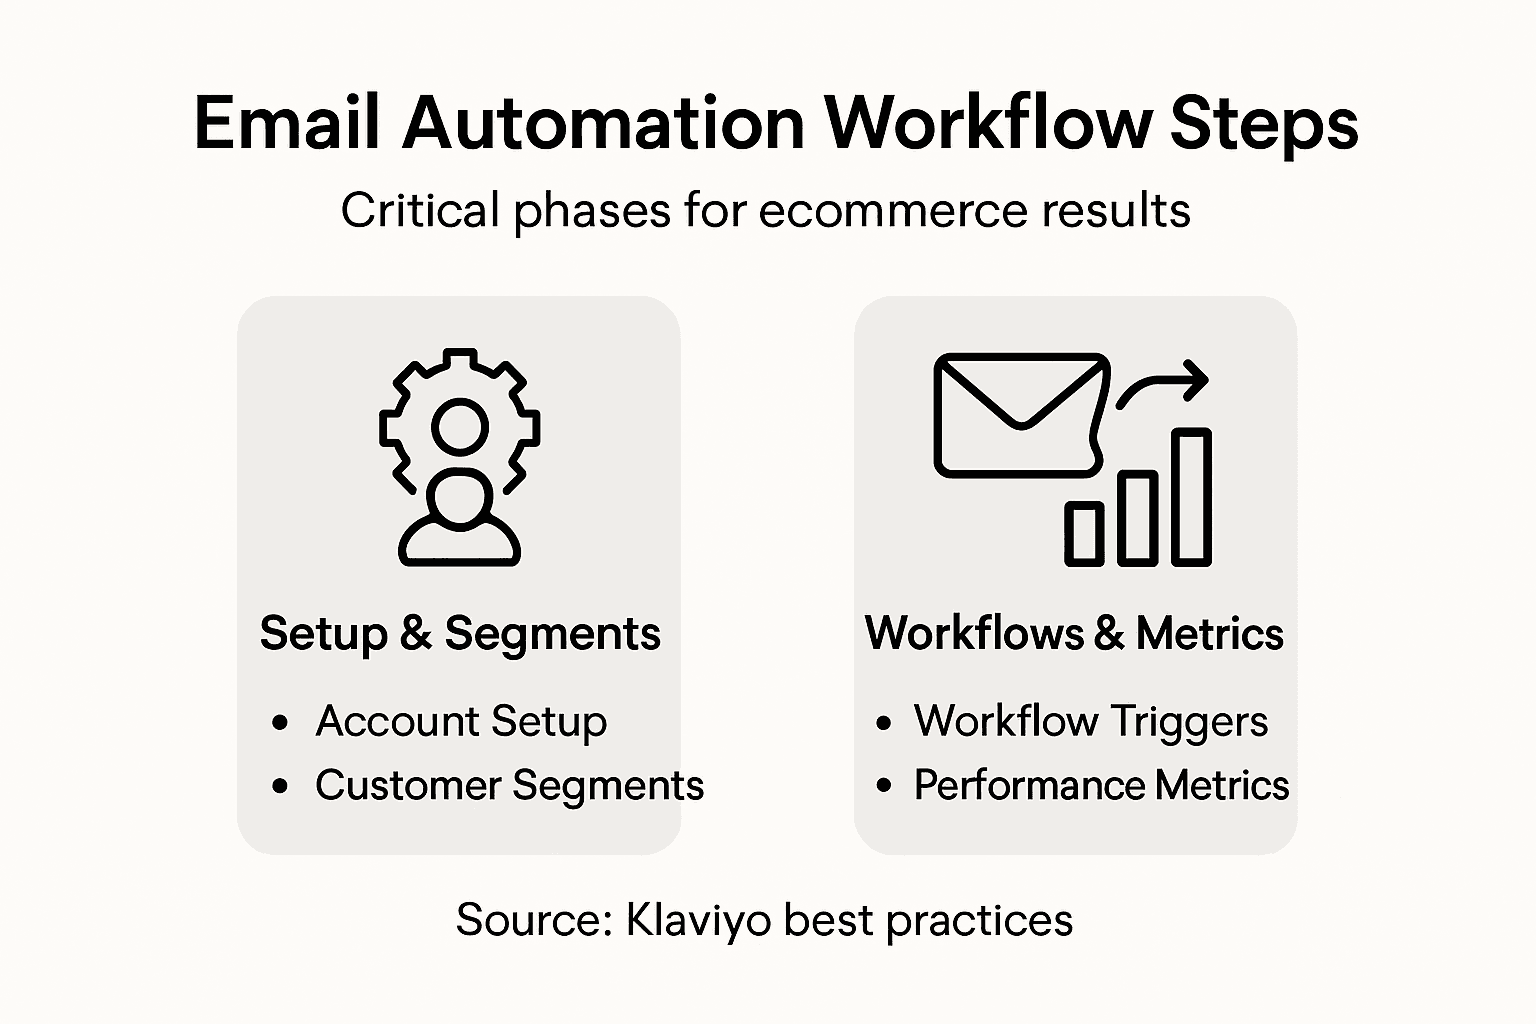
- Step 1: Set Up Klaviyo Account and Integrations
- Step 2: Define Customer Segments and Automation Goals
- Step 3: Build Email Workflow Templates and Triggers
- Step 4: Configure Automation Timelines and Conditions
- Step 5: Test and Launch Email Automation Workflow
- Step 6: Monitor Performance and Optimize Workflow
Quick Summary
| Key Point | Explanation |
|---|---|
| 1. Properly Set Up Klaviyo Integrations | Take time to connect your eCommerce platform accurately to ensure smooth data flow and functionality. |
| 2. Define Segments and Goals | Create specific customer segments and establish goals for each to drive targeted and effective campaigns. |
| 3. Create Tailored Email Workflows | Develop automated email templates and triggers that align with customer actions for better engagement. |
| 4. Optimize Timing and Conditions | Schedule email sends thoughtfully and set conditions to ensure messages are relevant and timely. |
| 5. Continuously Monitor and Improve | Regularly review performance metrics and test modifications to enhance the effectiveness of your workflows. |
Step 1: Set Up Klaviyo Account and Integrations
You’re about to build the foundation of your entire email marketing operation. Creating a Klaviyo account and connecting it to your eCommerce platform takes maybe 30 minutes, but it sets the stage for everything that comes after. Getting this right means your customer data flows cleanly into Klaviyo, your integrations work without hiccups, and you can actually start building workflows that drive revenue instead of wrestling with connection issues.
Start by heading to Klaviyo’s website and clicking to create a new account. You’ll provide your business email, password, and basic company information. This initial setup is straightforward, but here’s where most people rush: take your time selecting your eCommerce platform during setup. Klaviyo integrates seamlessly with Shopify, Magento, WooCommerce, and others, so choose the one you actually use. If you’re running on Shopify, select that option and authorize the connection right there. The platform will ask for permission to access your store data, which it needs to pull customer information, purchase history, and behavioral data. Don’t panic about this—Klaviyo processes customer data as a service provider following your instructions and maintains compliance with data privacy frameworks, so your customer information stays protected.
Once your primary eCommerce connection is live, move to integrations. Most fast-growing brands connect additional tools beyond their store platform. If you’re running paid ads, link your Meta Ads and Google Ads accounts so Klaviyo can track conversions and sync audiences. If you’re using Zendesk for customer support, connect that too—it helps you track customer interactions alongside email engagement. You can add these integrations through the Integrations section in your Klaviyo account settings. Each integration requires you to authorize Klaviyo to access that tool’s data. It sounds like a lot, but you only do this once. After setup, data syncs automatically between systems.
Pro tip: Before connecting integrations, audit which tools actually feed your email strategy. Only integrate platforms that provide customer data or audience insights you’ll actively use—every extra integration adds complexity to your account without necessarily improving results.
Step 2: Define Customer Segments and Automation Goals
Now that your Klaviyo account is connected, you need to decide who you’re actually talking to and what you want to happen when they hear from you. This step separates brands that send random emails from those that see measurable revenue growth. You’re going to map out your customer segments and establish clear automation goals for each one. Think of this as drawing a target before you aim your arrows.
Start by examining your customer data inside Klaviyo. Pull reports on who’s buying from you, how often they purchase, what they spend, and where they come from geographically. You’ll likely notice patterns. Maybe you have first-time buyers who spend less than $50, repeat customers who average $200 per order, and VIP customers making purchases every month. You might also segment by behavior, like people who browsed your site but never bought, or customers who opened your last five emails versus those who never open anything. Effective market segmentation uses demographics, geography, psychographics, and behavior to create meaningful groups. In Klaviyo, start building segments based on these criteria. Create one segment for first-time buyers, another for your best repeat customers, another for inactive subscribers. The more specific your segments, the more relevant your emails become.
Once your segments exist, define what automation goals you want each segment to achieve. For new customers, your goal might be to increase repeat purchase rate by 20 percent within 60 days. For inactive customers, your goal might be to win them back with a special offer or re-engage them enough to stay on your list. For VIP customers, your goal could be to increase average order value by introducing them to your premium products. Write these goals down. They become your north star when building workflows. If your goal is to increase repeat purchases, you’ll design welcome sequences, post-purchase followups, and browse abandonment campaigns differently than if your goal is simply to keep people on your list. Each segment gets its own set of automations aimed at its specific goal. This clarity means you stop sending generic emails and start sending campaigns that actually move the needle on revenue.
Pro tip: Start with just three to five core segments rather than fragmenting your audience into dozens of micro-segments. You’ll achieve better results with focused workflows targeting meaningful groups than spreading your effort across too many small buckets.
Here’s a quick comparison of common customer segments and typical automation goals:
| Segment Type | Key Characteristics | Example Automation Goal |
|---|---|---|
| First-Time Buyers | New customers, $0-$50 purchase | Increase repeat purchases by 20% |
| Repeat Customers | 2+ purchases, $200/order average | Upsell higher-value products |
| VIP Customers | Frequent buyers, high spenders | Boost average order value |
| Inactive Subscribers | No purchase/activity, 90+ days | Win back with targeted offers |
| Browsers | Viewed products, no purchase | Convert to first-time buyers |
Step 3: Build Email Workflow Templates and Triggers
This is where your automation actually comes to life. You’re going to create the email templates that will go out automatically when customers take specific actions, and you’re going to define the triggers that tell Klaviyo when to send them. A trigger is the event that starts everything. A template is the message itself. Together, they form the backbone of your revenue-generating email machine.
Start by identifying the triggers you want to use. These are specific actions or conditions that automatically launch your emails. A customer signing up to your list triggers a welcome email. Someone abandoning their shopping cart triggers a recovery sequence. A customer making a purchase triggers a post-purchase follow up. Someone who hasn’t opened an email in 90 days might trigger a re-engagement campaign. Workflow automation uses triggers based on events like sign-ups, purchases, or inactivity to initiate email sequences automatically. In Klaviyo, go to your Flows section and select which trigger applies to each workflow. If you’re building a welcome series for new subscribers, select the “joined list” trigger. If you’re building cart abandonment, select the “abandoned checkout” trigger. Be specific here. The wrong trigger sends emails at the wrong time or to the wrong people, which tanks your metrics fast.

Now build your email templates. Go into your template editor and create the actual emails that will send. Write compelling subject lines, body copy that speaks to your segment, and clear calls to action. This is not the time to copy paste generic templates from 2015. Your first-time buyer welcome sequence should feel different than your VIP customer sequence. Your cart abandonment email should feel different than a browse abandonment email. Create templates that match the intent of the workflow and the needs of your segment. You can use Klaviyo’s drag and drop editor to add product recommendations, images, buttons, and dynamic content that personalizes based on customer data. Once your template looks right, save it and attach it to your trigger. Set the timing so the email sends at the right moment. Maybe your welcome email sends immediately. Maybe your post-purchase follow-up sends two days after the purchase. Map out the timing that makes sense for each workflow. Your automation engine is now ready to run.
Pro tip: Build one complete workflow from trigger through email sequence before moving to the next one. Testing a single workflow thoroughly with real data helps you spot issues before scaling up to five or ten automated campaigns running simultaneously.
Step 4: Configure Automation Timelines and Conditions
Timing is everything in email automation. Send a welcome email too late and the customer forgets they even signed up. Send a cart abandonment email too soon and it feels pushy. Send a re-engagement campaign to someone who just made a purchase and you look tone deaf. This step is about setting up the exact timing and conditions that make your workflows feel natural and effective. You are going to specify when each email sends and under what circumstances it actually goes out.
Start by mapping out your timeline for each workflow. If you are building a welcome series, decide whether the first email sends immediately or after a two hour delay. Immediate sends catch people while excitement is high. Delayed sends might perform better if your customers typically check email in the morning. For a post-purchase flow, maybe the first email goes out within an hour, the second one goes out three days later, and the third goes out one week later. Automation timelines require orchestrating and scheduling tasks with proper timing and conditions to maintain workflow integrity and effectiveness. In Klaviyo, you set these delays in your flow settings. Click on each email in your workflow and specify the delay before it sends. You can also set a specific time of day. Maybe you want all emails to send at 9am in the recipient’s local timezone rather than all at once. This personalization feels thoughtful to customers and typically improves open rates.
Now add conditions to your workflows. Conditions let you branch the workflow based on what the customer actually does. In your welcome series, maybe if a customer makes a purchase within five days, they skip the “buy now” email because they already bought. Or if they click a link in your first email, they go down a different path than someone who ignores it. In a cart abandonment workflow, you might send a first email after one hour, but only if the cart is still abandoned. If they purchased in that hour, the workflow stops completely. These conditions prevent you from sending contradictory or irrelevant messages. A customer who already bought does not need to see your cart recovery email. Someone who engaged with your content does not need to see a re-engagement campaign. Set your conditions in the flow builder by adding conditional logic branches. Each branch checks for a specific action or inaction, then routes the customer accordingly. Your automation now becomes smart enough to read customer behavior and respond appropriately rather than blasting everyone with the same message regardless of what they actually do.
Pro tip: Test your timing on a small segment first before rolling it out to your entire audience. Send a workflow to 100 customers, track the open and click rates, then adjust the timing or conditions based on performance before automating it at scale.
Step 5: Test and Launch Email Automation Workflow
Before you send your first automated email to thousands of real customers, you need to validate that everything actually works. A workflow that looks perfect in your editor might have a broken link, send to the wrong segment, or trigger at the wrong time. Testing catches these disasters before they happen. You are going to run your workflow through a complete validation process, then launch it live with confidence.
Start by creating a test email address for yourself. In Klaviyo, you can designate test recipients for your workflows. Set up one workflow in test mode and send yourself through the entire automation from start to finish. Actually click the links in your emails. Check that the product recommendations are correct. Verify that dynamic content personalizes properly with your test data. Look at the email rendering in different devices and email clients. A beautiful email in Gmail might look broken in Outlook. Automated process testing validates that each workflow step triggers the intended actions and communications correctly. In Klaviyo, run a test through your entire flow and watch what happens at each step. Check your flow analytics to confirm emails are triggering on the right conditions. Make sure customers who should skip certain emails actually skip them. If you set up a condition so customers who make a purchase exit the workflow, test it. Add a test product to your cart, abandon it, then complete the purchase. Does the cart abandonment email stop sending? It should. Check that your timing works too. If you set an email to send two days later, look at the scheduled send time in your test results.
Once you are confident everything functions correctly, launch to a small segment first. Send your automation to maybe 5 percent of your total list or a specific segment rather than everyone at once. Monitor the results for 24 to 48 hours. Watch open rates, click rates, and conversions. Are the metrics what you expected? Are customers complaining? Are there any obvious errors? If everything looks good, expand the audience. Roll it out to 25 percent of your list, monitor again, then eventually to your full audience. This gradual launch approach protects you from catastrophic mistakes while giving you real performance data to validate your workflow is actually working.
Pro tip: Keep detailed records of your baseline metrics before launching so you can accurately measure the impact of each new workflow. Screenshot your conversion rate, email engagement metrics, and revenue numbers, then compare them 30 days after launch to quantify the actual revenue gain.
Step 6: Monitor Performance and Optimize Workflow
Launching your automation is not the finish line. It is the beginning of the real work. Your workflows will generate data every single day, and that data tells you exactly what is working and what needs to be fixed. You are going to track key metrics, identify weak spots, and make targeted improvements that compound into significant revenue gains over time.
Start by establishing which metrics actually matter. Open rates show you if your subject lines are compelling. Click rates show you if your content resonates. Conversion rates show you if your workflow actually drives revenue. Revenue per email shows you the true financial impact of each automation. In Klaviyo, navigate to your Flow reports and pull these metrics for each workflow. Look at performance by segment too. Maybe your welcome series converts great for customers in the United States but underperforms internationally. Maybe your cart abandonment email gets fantastic clicks but few actual purchases. Monitoring workflows provides real-time visibility into performance and health of automated processes so you can identify exactly where improvement is needed. Compare your current metrics against your baseline numbers from before the workflow launched. If your revenue per email increased by 15 percent, that workflow is working. If it increased by only 2 percent, something needs adjustment.
Now identify what to optimize. If open rates are low, test different subject lines. Split test two versions of your subject line with 50 percent of your audience each and watch which one performs better. If click rates are low but opens are strong, your email content is not compelling enough. Rewrite the body copy or adjust your call-to-action. If clicks are high but conversions are low, the problem might be your landing page, not your email. If a specific segment consistently underperforms, try sending at a different time or adjusting the delay before the email sends. Performance management involves continuously improving processes through targeted adjustments and refinement to achieve better outcomes. Make one change at a time so you know what actually moved the needle. If you change the subject line, timing, and content all at once and metrics improve, you will not know which change actually worked. Test it again with just the winning subject line to confirm. Keep notes on every test you run. After three months of optimization, you will have a body of knowledge about what works for your audience. Your welcome series might have 50 percent higher conversion rates than it did on day one, just from small targeted improvements.
Pro tip: Set up weekly performance reviews where you check metrics for each active workflow and identify one optimization to test. Consistency in testing, even small changes, compounds into major revenue improvements over a year.
Use this summary to quickly understand key metrics to monitor and how to optimize:
| Metric | Reveals | Optimization Approach |
|---|---|---|
| Open Rate | Subject line effectiveness | Test new subject lines |
| Click Rate | Content relevance | Improve offers or visuals |
| Conversion Rate | Workflow revenue performance | Adjust targeting or timing |
| Revenue per Email | Financial impact of each email | Refine audience and message |
Unlock the Full Potential of Your Klaviyo Email Automation for eCommerce Success
Building effective email automation workflows is critical to improving customer engagement, increasing repeat purchases, and driving real revenue growth. This article highlights common challenges like pinpointing the right customer segments, timing your emails perfectly, and creating dynamic workflows that react to customer behavior instead of sending generic blasts. If you find yourself overwhelmed by setting up triggers, testing sequences, or optimizing performance metrics such as open rates and conversion rates, know that you are not alone.
At Swyft Interactive, we specialize in solving these exact pain points by combining expert Klaviyo email marketing with fully integrated, conversion-focused eCommerce website development. Our proven approach helps brands create smart, data-driven automation that transforms casual browsers into loyal customers. Whether you need comprehensive campaign management or strategic customer journey mapping, our tailored solutions create measurable improvements in revenue and engagement. Discover how our team can take your email workflows to the next level with deep automation expertise by exploring our Email Marketing Archives – Swyft Interactive.
Ready to stop guessing and start growing with Klaviyo automation? Visit Swyft Interactive today to schedule a consultation. Leverage our expertise in full-funnel digital strategy and Klaviyo mastery to build scalable email automations that deliver consistent results. Explore more of our insights in the Digital Strategy Archives – Swyft Interactive or sharpen your skills with unique tips in You Suck At Klaviyo Archives – Swyft Interactive. Take the first step now to automate smarter and grow faster.
Frequently Asked Questions
How do I create a Klaviyo account for email automation?
To create a Klaviyo account, visit Klaviyo’s website and click to set up a new account. You will need to provide your business email, password, and some basic company information to get started.
What integrations should I connect to Klaviyo for effective email automation?
Connect your primary eCommerce platform, such as Shopify or WooCommerce, and any additional tools like Meta Ads or Google Ads, which help track conversions. Ensure each integration is set up correctly to allow for seamless data syncing across platforms.
How do I define customer segments for my email automation?
To define customer segments, analyze your existing customer data in Klaviyo and identify groups based on characteristics like purchasing behavior and engagement levels. Focus on creating 3 to 5 core segments to ensure your emails are relevant and targeted.
What are the key triggers I should set up in my email automation workflows?
Key triggers to set up include actions such as customers signing up for your list, abandoning their shopping carts, and making purchases. Configure specific conditions so that the right emails are sent at the right times, like a welcome email after sign-up or a cart recovery email after abandonment.
How can I test my email automation workflows before launch?
To test your email automation workflows, create a test email address and set up the workflow in test mode. Run a full test from start to finish, checking that triggers activate correctly and emails render properly across devices before launching to your entire audience.
What metrics should I monitor after launching my email automation workflows?
Monitor key metrics such as open rates, click rates, and conversion rates to gauge performance. Set up regular performance reviews, and use this data to make targeted improvements that could boost revenue by adjusting emails and engagement strategies.